Elves

Need a special hostess gift? Want to dress up your counter or bar? Or do you just feel like doing a fun craft project?

Can’t tell you how many of these sold at shows this holiday season. Crazy! But they are cute. And easy and fun to make. And, of course, the thought of a bunch of little elves running around the place made me smile. 🙂

And, they are what they say, “easy peasy”.
elvesetc 060
elvesetc 059

You can easily make a pattern for them from looking at the picture. A long triangle and then the little piece for the beard. And you can adjust the beard piece to your liking.

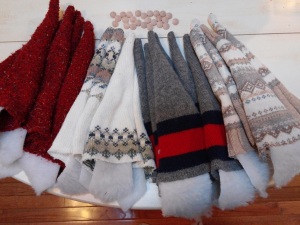
You will need old sweaters, I got mine from Goodwill. Wash and shrink them. Wool ones really do work best but if you are short on wool ones like I was, then an acrylic one will work

You will also need the fur for the beard. There is an assortment of fur available at JoAnnes Crafts and Fabrics store. Small sized metallic fur balls can be found at Michaels and the little wooden plugs may be found at your local hardware store, Menards, or Home depot.
elvesetc 057

Assembly is easy. Take a beard and center it on the straight end of the hat on the wrong side. Zigzag across the entire edge..
elvesetc 058

Next, sew together the long sides creating a point. Now this is where I thought it might be a pain but wasn’t. You turn it inside out. I thought it might be a little difficult because it is such a small point, but I guess beacause of the stretchy material it turned quite easily.
elvesetc 062

Using a glue gun, I attached the wooden plug right below the hat centering it on the beard. And I also used a glue gun to fasten the metallic fur ball to the point of the hat.
elvesetc 063
Voila! You have your elf!

Ornaments and Trimming Beards

So what do ornaments and trimming beards have in common? Well, the main thing is that they are items that I am creating for a Holiday Market in Naperville put on by Room 363. Indeed it is that time of year. And, shamefully, I am one of the few people glad to see the Christmas items on display in stores. Terrible, right? You see that preparing for a holiday show does not happen overnight. And I had a few ideas in mind but it involved using some Christmas themed items that were not readily available. For instance there is a certain color green tissue paper that I wanted to use for ornaments. I looked everywhere I could think of that sold giftwrapping. Then about the time I was about to forget that particular color I went into JoAnne Fabrics. They had put out a fair amount of Christmas decor and lo and behold there was just what I was looking for! With a sigh of relief I knew then that I would indeed be able to complete what I had just begun, and with time to spare.

elveschuckstephencharlie 003

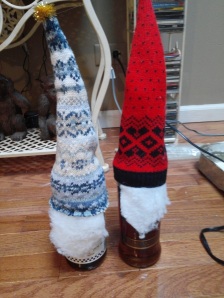
The elves are what I call Wine Elves. They are a nice little touch when taking a gift of wine for the hostess of the get together that you are going to for the holidays. It just slips onto the top of the bottle. Dresses it up a little doesn’t it?

craftitems 021

I really enjoyed working on the ornaments. I’m including some photos of them during the process. Easy enough to do, although a little messy with the glitter and all.

craftitems 015

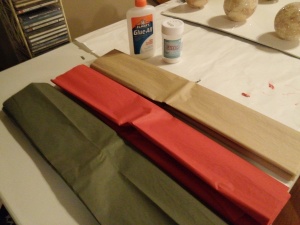
Using styrofoam balls (I used the larger ones), loosen up Elmer’s glue with a little water and “glue” on about 3″ torn sheets of a tissue paper that you want to use. I used 3 colors.

craftitems 014

craftitems 016

Let dry. A good way to do this is to poke screws through foamcore and then press the balls onto the screws like in the photos.

When dry brush on a thin coat of the glue mixture and then sprinkle with crystal glitter. Let dry again. This is the messy part…..I try to brush off as much loose glitter as possible at this point.

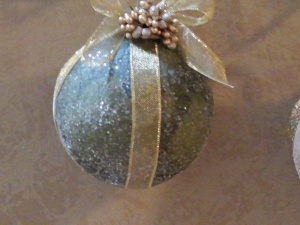
Using about a 5/8 ribbon wrap it around the ornament twice and tie a standard bow. (This can be a little tricky depending on the ribbon you used.) Next I hot glued some little gold berries to the top. You could use acorns for a nature feeel.
craftitems 017

Voila!
craftitems 011

craftitems 012
craftitems 013

Like I said, it is a little messy, but this could make a nice little gift couldn’t it? Or maybe you would just like it to dress up your own tree.

Enjoy your day! ( I’ve been battling a really bad cold this week and looking for some relief!)
Doris

Transferring A Favorite Photo

Hello there!

In my last post on transferring images I said that I would show how to do a standard photograph. Well, I decided to do one of a favorite photo that I have and wasn’t quite sure how I wanted to display it. This is a perfect opportunity to use the transfer process.
stephenchuckcharlie

Basically you need the same materials as for a painted image. That would be a photocopy of the photo that you want to transfer, gel medium, a preferred canvas, and a sponge.
elveschuckstephencharlie 005

Apply the gel evenly to the canvas and lay the copy over it with the image side down. I chose an 8×10 canvas and simply printed a copy of the image off my home printer. If you go to a printer do get your copy, do not use photo paper for this process, use regular photocopy paper. My printer had reassured me that their photo paper was used regularly when customers wanted to transfer images. So I went ahead and used their paper for an order. Wrong. I couldn’t figure out what I was doing wrong so I googled it. What my printer was calling transferring is very different from what I was wanting to do. What they were saying was transferring was in reality attaching a photo, face side up and it is simply “glued” on. That is not what this is about. The reason I settled on their paper was because of the size of the image my customer wanted to use. It was 20×24 and the printer can’t make copies on regular photocopy paper on something that large. Just a heads up to you. If you ever have any questions about it don’t hesitate to ask.
elveschuckstephencharlie 006
I decided to crackle the sides instead of putting a standard frame on it. I based it with a medium brown (I used PPG Earthy Ochre, but any medium brown will work), used a crackle medium over this (I only needed a little so I used Martha Stewart’s Crackle Medium), and then painted it with an offwhite called French White, which is a BJM color.

elveschuckstephencharlie 007

By the way this makes for great Christmas gifts. A real personal touch to gift giving.

I’m, not sure if I mentioned this in the last post, but when you transfer an image in this manner it will be a reverse of what it shows in the original photo.

So have fun with it and maybe someone you know will receive that personalized gift this holiday season.
Have a great day!
Doris

Christmas In July! Free Shipping!

It’s a sale! Yay!

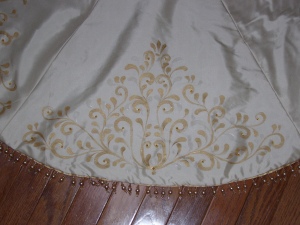
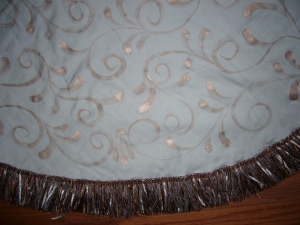
Every year I run a Christmas In July Sale offering a discount on Christmas items in my Etsy shop. This year is no different. This year I have decided to offer free shipping on anything relating to Christmas. Whether it be a tree skirt or stocking, or maybe a custom painting that has a Christmas theme.
handpaintedsilkaccessories 010

handpaintedsilkaccessories 011

A little too warm and rainy for you to be thinking of Christmas? Can’t forget the first day of summer was just 9 days ago? That’s okay! You have all month to warm up to the idea! (Pun intended, lol)
handpaintedsilkaccessories 008
handpaintedsilkaccessories 009
There are so many things I love about silk…..the feel, the sheen, the way it drapes. And believe it or not, it is a pleasure to paint on.
bluetreeskirtandstocking 001
bluetreeskirtandstocking 002

These are some of the Christmas related items that I have in my shop right now. I am, however starting on handpainted ornaments and a vintage/shabby chic tree skirt and stocking. That is besides a couple of Hydrangea paintings I have in the works, which I will be posting on before too long.
bluetreeskirtandstocking 003
bluetreeskirtandstocking 004

I really love combining sewing and painting. The cream colored silk tree skirt and stocking I even got to do some hand sewing in the way of quilting and sewing on beadwork.
It’s all good!

You can find the sizes and prices on my Etsy shop…
https://www.etsy.com/shop/dcartwork?ref=pr_shop_more

Have a good week!
Doris

A Reconnected Friend

I am spotlighting a friend from school days. Dixie and I were in the same Drama class. She also reminded me that we were in the same French class as well. She always laughed alot and was a chatterbox (I don’t think she’ll mind my saying so, we all love her for it). She has also always been a highly creative person. Of recent days she is working on jewelry pieces. I asked her to give us some insight into how it all works.
And here is Dixie Jo Maskell:

A Bracelet Project
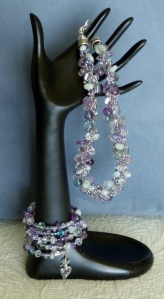
P1030385

Materials: Bracelet Memory Wire Assorted beads, spacers, stones & crystals

P1030406

Flush cutters for Memory Wire Jump rings if adding embellishment

Round Nose Pliers

This is a wonderful way to use up leftover beads, spacers or crystals. Memory wire is available at most quality craft outlets, through beadshops or online. Available are ring, bracelet or necklace wires and in some cases, all the above are in one package such as the one I am showing here from BeadSmith. There will be plenty of wire for several projects. Memory Wire is extremely hard and you should never use your good flush cutters to cut it. It will ruin them. You need to get a special cutter meant just for Memory Wire. They are relatively inexpensive and you won’t be sorry you spent the extra when you see how much you will enjoy putting these easy bracelets together. Your children or grandchildren will love it as well.

You decide how many times you would like the bracelet to wrap around your arm by winding the wire around your arm. Then I mark it with a piece of tape. This will be the cutting spot. The bracelet I am showing is 5 wraps. I made the beginning and ending place on the bracelet at different spots because I wanted to make a wired embellishment that was free to swing.

Now, you have two choices here. They make Memory Wire end caps that can be glued to the end of the wire and look fabulous. However, for those who can’t find them, or don’t wish to glue anything, this is the alternative step. Take your round nose pliers and grab the end of the wire by the tips of the pliers. Make a loop by holding the wire on one end with your round nose pliers and twisting your wrist to form a circle in the wire. You will have to let go and re-adjust the placement of the tip of the pliers several times to get the wire to form an 0. This will close off the end so your beads don’t escape!

Now I just take an empty box, bowl or whatever you have around the house, and dump in your beads, spacers, crystals, seed beads, bugles, stones (etc.) Basically if it has a hole in it and can be strung onto the wire, it will work! Mix them up good and then start stringing them on the wire. I tend to stop every so often and release the tension on the wire so I can make sure I am getting a good mix and that the row above and below where I am working has different beads than the one above. Or, you might just want to put on all the same kinds of beads, or a few beads with a metal spacer in between. Whatever you heart desires will work as this is just making a piece that gives you pleasure!

When you reach the end of the wire with still a small bit of wire showing, you will wrap the next end with the round nose pliers again or glue on another end cap to finish the bracelet. You have created this round circle of wire at both ends and you can use a jump ring to attach a charm or wired bead. If you have used end caps, put your jump ring just before the end cap. This adds a nice finish to your bracelet.
P1030401

This is a great, simple project to make something that will match what you are wearing or to use as a gift. The necklace in the photo is a wire crocheted piece that I used the same beads for. Now go out there, create and have fun!

Thanks for your interest!

Dixie Jo Maskell

Hands & Heart of Dixie