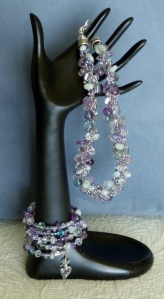
I am spotlighting a friend from school days. Dixie and I were in the same Drama class. She also reminded me that we were in the same French class as well. She always laughed alot and was a chatterbox (I don’t think she’ll mind my saying so, we all love her for it). She has also always been a highly creative person. Of recent days she is working on jewelry pieces. I asked her to give us some insight into how it all works.
And here is Dixie Jo Maskell:
Materials: Bracelet Memory Wire Assorted beads, spacers, stones & crystals
Flush cutters for Memory Wire Jump rings if adding embellishment
Round Nose Pliers
This is a wonderful way to use up leftover beads, spacers or crystals. Memory wire is available at most quality craft outlets, through beadshops or online. Available are ring, bracelet or necklace wires and in some cases, all the above are in one package such as the one I am showing here from BeadSmith. There will be plenty of wire for several projects. Memory Wire is extremely hard and you should never use your good flush cutters to cut it. It will ruin them. You need to get a special cutter meant just for Memory Wire. They are relatively inexpensive and you won’t be sorry you spent the extra when you see how much you will enjoy putting these easy bracelets together. Your children or grandchildren will love it as well.
You decide how many times you would like the bracelet to wrap around your arm by winding the wire around your arm. Then I mark it with a piece of tape. This will be the cutting spot. The bracelet I am showing is 5 wraps. I made the beginning and ending place on the bracelet at different spots because I wanted to make a wired embellishment that was free to swing.
Now, you have two choices here. They make Memory Wire end caps that can be glued to the end of the wire and look fabulous. However, for those who can’t find them, or don’t wish to glue anything, this is the alternative step. Take your round nose pliers and grab the end of the wire by the tips of the pliers. Make a loop by holding the wire on one end with your round nose pliers and twisting your wrist to form a circle in the wire. You will have to let go and re-adjust the placement of the tip of the pliers several times to get the wire to form an 0. This will close off the end so your beads don’t escape!
Now I just take an empty box, bowl or whatever you have around the house, and dump in your beads, spacers, crystals, seed beads, bugles, stones (etc.) Basically if it has a hole in it and can be strung onto the wire, it will work! Mix them up good and then start stringing them on the wire. I tend to stop every so often and release the tension on the wire so I can make sure I am getting a good mix and that the row above and below where I am working has different beads than the one above. Or, you might just want to put on all the same kinds of beads, or a few beads with a metal spacer in between. Whatever you heart desires will work as this is just making a piece that gives you pleasure!
When you reach the end of the wire with still a small bit of wire showing, you will wrap the next end with the round nose pliers again or glue on another end cap to finish the bracelet. You have created this round circle of wire at both ends and you can use a jump ring to attach a charm or wired bead. If you have used end caps, put your jump ring just before the end cap. This adds a nice finish to your bracelet.

This is a great, simple project to make something that will match what you are wearing or to use as a gift. The necklace in the photo is a wire crocheted piece that I used the same beads for. Now go out there, create and have fun!
Thanks for your interest!
Dixie Jo Maskell
Hands & Heart of Dixie


