Transferring A Favorite Photo

Hello there!

In my last post on transferring images I said that I would show how to do a standard photograph. Well, I decided to do one of a favorite photo that I have and wasn’t quite sure how I wanted to display it. This is a perfect opportunity to use the transfer process.
stephenchuckcharlie

Basically you need the same materials as for a painted image. That would be a photocopy of the photo that you want to transfer, gel medium, a preferred canvas, and a sponge.
elveschuckstephencharlie 005

Apply the gel evenly to the canvas and lay the copy over it with the image side down. I chose an 8×10 canvas and simply printed a copy of the image off my home printer. If you go to a printer do get your copy, do not use photo paper for this process, use regular photocopy paper. My printer had reassured me that their photo paper was used regularly when customers wanted to transfer images. So I went ahead and used their paper for an order. Wrong. I couldn’t figure out what I was doing wrong so I googled it. What my printer was calling transferring is very different from what I was wanting to do. What they were saying was transferring was in reality attaching a photo, face side up and it is simply “glued” on. That is not what this is about. The reason I settled on their paper was because of the size of the image my customer wanted to use. It was 20×24 and the printer can’t make copies on regular photocopy paper on something that large. Just a heads up to you. If you ever have any questions about it don’t hesitate to ask.
elveschuckstephencharlie 006
I decided to crackle the sides instead of putting a standard frame on it. I based it with a medium brown (I used PPG Earthy Ochre, but any medium brown will work), used a crackle medium over this (I only needed a little so I used Martha Stewart’s Crackle Medium), and then painted it with an offwhite called French White, which is a BJM color.

elveschuckstephencharlie 007

By the way this makes for great Christmas gifts. A real personal touch to gift giving.

I’m, not sure if I mentioned this in the last post, but when you transfer an image in this manner it will be a reverse of what it shows in the original photo.

So have fun with it and maybe someone you know will receive that personalized gift this holiday season.
Have a great day!
Doris

Transferring Photos Onto Canvas

A good DIY project here. Not difficult one bit. It does require some patience, or so it seems to me.

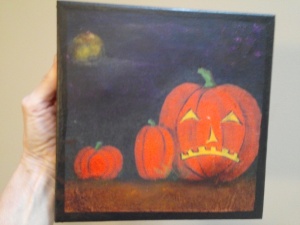
I have done these in the past of reduced photos of my floral paintings. People seem to like them so I thought I would attempt it for Halloween.
https://www.etsy.com/listing/205046384/halloween-decor-original-handpainted?ref=shop_home_active_10

You will need:

A canvas (I would start off with a manageable size, I used 8×8 for these)
Gel medium (I recommend getting a better quality, it will be worth the extra cost)
transfershalloweenshow 010
A paint brush to apply the gel.
A photo of what you want to transfer.
transfershalloweenshow 013

First off, make yourself a good photocopy of the piece you want to transfer. I prefer to go to Staples and get a good quality copy from their copiers. Lay it face side down over the chosen canvas so that you can line up the picture correctly. I crease the sides a little so as to lay it on the gel easier.
transfershalloweenshow 009

Liberally apply the gel medium to the blank canvas making sure to fill in all the little valleys. Smooth it out so that there won’t be any air pockets created. Make sure you put enough of the gel on, about 1/8 inch thick or a little more. It does make a difference.

Position the photocopy face down onto the gel, adjusting it to sit in the position that you want. You can slide it around a little with no harm done so no worries there.

Smooth it out for several minutes with your fingertips. I find that it adheres much better if I take the time to smooth it out for a few minutes. Once it is adjusted and smoothed down set it aside overnight. It needs to dry thoroughly before you move on to the next step.
transfershalloweenshow 015

transfershalloweenshow 008

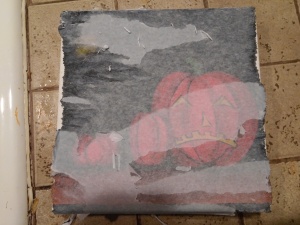
Once dry you can peel off the paper and the transfer will appear. You will need to do this step a few times. Most directions say 1-3 times. I found I had to do at least 5 times. it’s no big deal really, you just want to keep this is mind. The way to start removing the paper is to use a damp sponge and blot the moisture onto the canvas. You can tell by the picture that it will look significantly different.

transfershalloweenshow 012

Once all of the paper is removed you can finish the canvas off. with the Halloween ones I crackled the sides with an orange and purple base and black over it. For the transfers of my paintings I gallery wrapped the image. By that I mean that I made the photocopy large enough that it wrapped around the sides.
transfershalloweenshow 023
transfershalloweenshow 025
transfershalloweenshow 024

So what are my overall thoughts on the process?

I truly love the concept. And I will be making more of transfers of my canvases. My Halloween ones? Well, to be honest, with the amount of time that I put into thransfering the images I could have painted them on alot more quickly. A little disappointing? Yes. Will it keep me from using the process again? Not one bit. Here are pictures of my floral canvases done up as transfers. Love them.
https://www.etsy.com/listing/126583734/original-wall-decor-8×8-painting-set-of?ref=shop_home_active_15

And I do plan on using this to transfer a photo that I would like to make look old and beat up. I will post on that as soon as I get it done. Is it worth the effort and do I recommend it? Absolutely. I do if you are wanting to transfer something as a gift, or if the original is timeconsuming , such as my oil paintings, or, like I said, if you are wanting to age and distress an old photo.

So, if you are at all crafty you can handle this one. Even if you’re not a real creative type. It would make for a great handmade Christmas gift. Very unique.

Hope you are enjoying the season!
Doris