It’s A Contest, Cavalcade 2014!

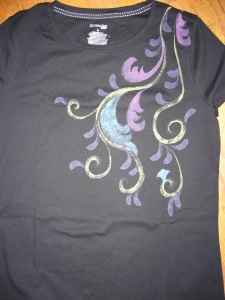
Would you like to own a one-of-a-kind hand painted ladie’s Tshirt? It’s easy! Just come up with the right answer to the question below and post it as a comment!
3scrollTshirts 002

The wall shown is going to have a unique traetment on it. Can you guess which room this wall is in?
contestkcb 001

This next photo is of the exterior of one of the models. It gives you an idea of the type of stone and brickwork being done. (I saw the bricklayers working hard on the project the other day. So nice to see our friends from B&B Masonry on the job!)
contestkcb 002

Notice the fancy stairwell in the background? Most days right now that is the only entrance. It is no place for a girly girl. lol

Cavalcade_Marketplace_May_9th

Cavalcade 2014

Cavalcade_Marketplace_May_9th

cavalcade1 001
Ah, yes, parking. It comes back to me now.lol

Lately I have been spending alot of time working up sample boards for the cavalcade models of King’s Court Builders. I can tell you one thing from what I have learned so far. They will be spectacular!
cavalcade1 002

Took a ride to the site the other day and got a good reminder of a priority for the first day of working on the job site. That is to get a handle on the parking situation. The other subcontractors are really the priority at this point so I give them as much space as they need. Usually, and as is the case this year, parking is only permitted on one side of the street. I hope you can get a feel for the congestion, there are 6 homes going up after all. If not, I plan on going by tomorrow and if it’s not too busy there to do a walk through by myself. It really helps things fall into place for me if I walk it myself with floorplans in hand.
cavalcade1 004

The photos are of the street views and the front of one of the models. The other model had alot of activity going on so i decided it could wait until another day.

Hope you are enjoying the great weather that we have today! Hoping it is nice out where you are!
Doris

A Reconnected Friend

I am spotlighting a friend from school days. Dixie and I were in the same Drama class. She also reminded me that we were in the same French class as well. She always laughed alot and was a chatterbox (I don’t think she’ll mind my saying so, we all love her for it). She has also always been a highly creative person. Of recent days she is working on jewelry pieces. I asked her to give us some insight into how it all works.
And here is Dixie Jo Maskell:

A Bracelet Project
P1030385

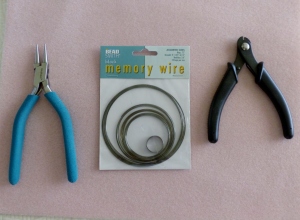
Materials: Bracelet Memory Wire Assorted beads, spacers, stones & crystals
P1030406

Flush cutters for Memory Wire Jump rings if adding embellishment

Round Nose Pliers

This is a wonderful way to use up leftover beads, spacers or crystals. Memory wire is available at most quality craft outlets, through beadshops or online. Available are ring, bracelet or necklace wires and in some cases, all the above are in one package such as the one I am showing here from BeadSmith. There will be plenty of wire for several projects. Memory Wire is extremely hard and you should never use your good flush cutters to cut it. It will ruin them. You need to get a special cutter meant just for Memory Wire. They are relatively inexpensive and you won’t be sorry you spent the extra when you see how much you will enjoy putting these easy bracelets together. Your children or grandchildren will love it as well.

You decide how many times you would like the bracelet to wrap around your arm by winding the wire around your arm. Then I mark it with a piece of tape. This will be the cutting spot. The bracelet I am showing is 5 wraps. I made the beginning and ending place on the bracelet at different spots because I wanted to make a wired embellishment that was free to swing.

Now, you have two choices here. They make Memory Wire end caps that can be glued to the end of the wire and look fabulous. However, for those who can’t find them, or don’t wish to glue anything, this is the alternative step. Take your round nose pliers and grab the end of the wire by the tips of the pliers. Make a loop by holding the wire on one end with your round nose pliers and twisting your wrist to form a circle in the wire. You will have to let go and re-adjust the placement of the tip of the pliers several times to get the wire to form an 0. This will close off the end so your beads don’t escape!

Now I just take an empty box, bowl or whatever you have around the house, and dump in your beads, spacers, crystals, seed beads, bugles, stones (etc.) Basically if it has a hole in it and can be strung onto the wire, it will work! Mix them up good and then start stringing them on the wire. I tend to stop every so often and release the tension on the wire so I can make sure I am getting a good mix and that the row above and below where I am working has different beads than the one above. Or, you might just want to put on all the same kinds of beads, or a few beads with a metal spacer in between. Whatever you heart desires will work as this is just making a piece that gives you pleasure!

When you reach the end of the wire with still a small bit of wire showing, you will wrap the next end with the round nose pliers again or glue on another end cap to finish the bracelet. You have created this round circle of wire at both ends and you can use a jump ring to attach a charm or wired bead. If you have used end caps, put your jump ring just before the end cap. This adds a nice finish to your bracelet.
P1030401

This is a great, simple project to make something that will match what you are wearing or to use as a gift. The necklace in the photo is a wire crocheted piece that I used the same beads for. Now go out there, create and have fun!

Thanks for your interest!

Dixie Jo Maskell

Hands & Heart of Dixie
2014 Cavalcade Of Homes

Hello there!

I have been given the good fortune of receiving permission to report here not only my work in the Cavalcade of Homes, but also to follow along with the construction phase of the 2 models that King’s Court Builders is having in the Cavalcade. I just love this. I love being a part of the great team that is pulling all of this together. I walked the models for the first time the other day with Pete Stefani, President of King’s Court Builders, Joelle Tilche, Director of Sales and Marketing, and Maria Hildebrand, Interior Designer on the project. There is just something about the construction phase that inspires me. My hope is to be able to convey not only the excitement of putting cavalcade models together, but also all of the hard work that everyone puts into it. And believe me it takes quite an effort to pull this off. A strong healthy challenge! Not only for myself, but also for the carpenters, electricians, plumbers, roofers, painters and whomever else I have left out. My part physically is secondary to the workings of it all.
http://www.cavalcadeofhomes.com

Weather permitting I will be stopping and taking the first photos today and posting within the next day or two. I also have another friend to introduce you to. And wait until you see her creations!

Have a great day everyone!
Doris

A Mother’s Day Treat

Happy Mother’s Day!

I follow the blog On Sutton Place. Ann Drake who writes it is quite an inspiration and she gave me permission to post one of her recipes. It is called Sour Cream Shortcake Bisquits. Not only is it delicious, it is quite delectable looking, and you probably have almost all of the ingredients on hand already. The only thing that you may need to purchase is sour cream.

Sour Cream Shortcake Bisquits

Ingredients
shortcakebisquits 033
2C Flour
1tsp Baking Powder
1/2tsp Baking Soda
1/4tsp Salt
1/4C Sugar
4T Butter, chilled
1C Sour Cream
1/4C Milk

Preheat oven to 425 degrees.

In a large bowl whisk together the flour, baking powder,baking soda. salt, and sugar.

Cut in the butter with a pastry blender. (or if you don’t have a pastry blender you can do as I did, cut it in by using 2 knives. Tha’s the old fashioned way).

Stir in the sour cream and milk.
shortcakebisquits 034
It should look “shaggy” at this point.

Spread it out on a cookie sheet until it is one inch thick. Sprinkle with sugar.
shortcakebisquits 035
Bake for 12-15 minutes, watching it closely near the end. You want the edges to be lightly browned.
shortcakebisquits 037
Cool slightly.
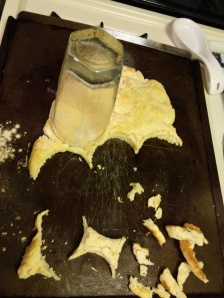
Cut into bisquits. You may have a bisquit ciutter. I used a glass. You can also serve it rustic by just breaking it into bits. it tastes great no matter what!
shortcakebisquits 038
Spread strawberries over a bisquit and serve!
shortcakebisquits 040
You may want to add a dollop of whipped cream. Also, I add some sweetener to the strawberries after I cut them up and let them set a bit.

I hope you all have a wonderful day today!
Doris